38. Copia de seguridad y restauración de PostgreSQL
Hay muchas formas de hacer copias de seguridad de una base de datos PostgreSQL, y la que elija dependerá en gran medida de cómo esté utilizando la base de datos.
Para bases de datos relativamente estáticas, se pueden utilizar las herramientas básicas pg_dump/pg_restore para tomar instantáneas (snapshots) periódicas de los datos.
Para los datos que cambian con frecuencia, el uso de un esquema de «copia de seguridad en línea» permite archivar continuamente las actualizaciones en una ubicación segura.
La copia de seguridad en línea es la base de los sistemas de replicación y de reserva para una alta disponibilidad, en particular para las versiones de PostgreSQL >= 9.0.
38.1. Organización de tus datos
Como se discutió en Esquemas en Postgresql, asegurarse de que los datos de producción siempre se almacenen en esquemas separados es una mejor práctica muy importante en la gestión de datos. Hay dos razones:
Respaldar y restaurar datos en esquemas es mucho más simple que gestionar listas de tablas a respaldar individualmente.
Mantener las tablas de datos fuera del esquema «public» permite actualizaciones mucho más fáciles, como se discutió en Actualizaciones del Software.
38.2. Respaldo y restauración básicos
Respaldar una base de datos completa es fácil usando la utilidad pg_dump. La utilidad es una herramienta de línea de comandos, lo que hace fácil automatizarla con scripts, y también puede invocarse mediante una GUI en la utilidad PgAdmin.
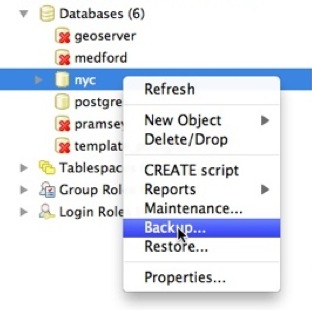
Para respaldar nuestra base de datos nyc, podemos usar la GUI, simplemente haz clic derecho en la base de datos que quieres respaldar:
Ingresa el nombre del archivo de respaldo que quieres crear.
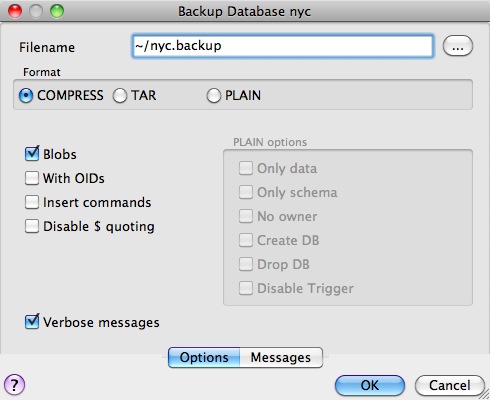
Ten en cuenta que hay tres opciones de formato de respaldo: compress, tar y plain.
Plain es solo un archivo SQL textual. Este es el formato más simple y en muchos sentidos el más flexible, ya que puede editarse o modificarse fácilmente y luego cargarse de nuevo en una base de datos, permitiendo cambios sin conexión en cosas como propiedad u otra información global.
Tar usa un formato de archivo de UNIX para guardar componentes del volcado en archivos separados. Usar el formato tar permite a la utilidad pg_restore restaurar de manera selectiva partes del volcado.
Compress es como el formato Tar, pero comprime los componentes internos individualmente, permitiendo que se restauren selectivamente sin descomprimir todo el archivo.
Marcaremos la opción Compress y procederemos, guardando un archivo de respaldo.
La misma operación puede hacerse desde la línea de comandos así:
pg_dump --file=nyc.backup --format=c --port=54321 --username=postgres nyc
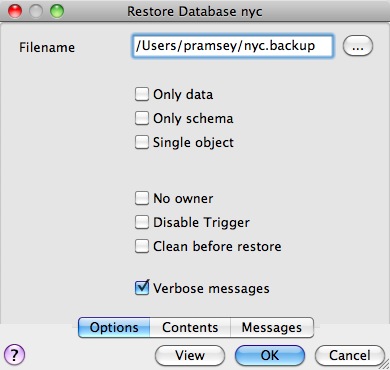
Como el archivo de respaldo está en formato Compress, podemos ver el contenido usando el comando pg_restore para listar el manifiesto. En la GUI de PgAdmin, «View» es una opción en el panel.
Cuando observas el manifiesto, una de las cosas que notarás es que hay muchas firmas de «FUNCTION».
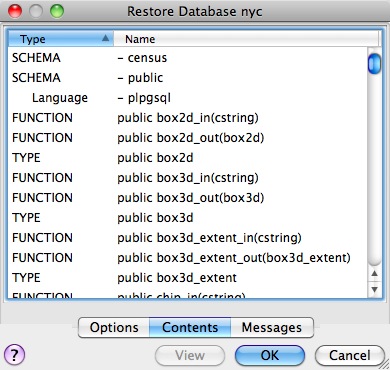
Eso se debe a que la utilidad pg_dump vuelca todos los objetos no del sistema en la base de datos, y eso incluye las definiciones de funciones de PostGIS.
Nota
PostgreSQL 9.1+ incluye una característica «EXTENSION» que permite que paquetes adicionales como PostGIS se instalen como componentes de sistema registrados y por lo tanto sean excluidos de la salida de pg_dump. PostGIS 2.0 y superiores soportan instalación usando este sistema de extensiones.
Podemos ver el mismo manifiesto desde la línea de comandos usando pg_restore directamente:
pg_restore --list nyc.backup
El problema con un archivo de volcado lleno de firmas de funciones de PostGIS es que realmente queremos un volcado de nuestros datos, no de nuestras funciones de sistema.
Dado que cada objeto está en el archivo de volcado, podemos restaurar en una base de datos vacía y obtener funcionalidad completa. Al hacerlo, esperamos que el sistema al que restauramos tenga exactamente la misma versión de PostGIS que la que usamos para el volcado (ya que las definiciones de firmas de funciones hacen referencia a una versión particular de la biblioteca compartida de PostGIS).
Desde la línea de comandos, la restauración se ve así:
createdb --port 54321 nyc2
pg_restore --dbname=nyc2 --port 54321 --username=postgres nyc.backup
Volcar solo datos, sin firmas de funciones, es donde tener datos en esquemas resulta útil, porque hay una bandera en la línea de comandos para volcar solo un esquema en particular:
pg_dump --port=54321 -format=c --schema=census --file=census.backup
Ahora, cuando listamos el contenido del volcado, vemos solo las tablas de datos que queríamos:
pg_restore --list census.backup

;
; Archive created at Thu Aug  9 11:02:49 2012
;     dbname: nyc
;     TOC Entries: 11
;     Compression: -1
;     Dump Version: 1.11-0
;     Format: CUSTOM
;     Integer: 4 bytes
;     Offset: 8 bytes
;     Dumped from database version: 8.4.9
;     Dumped by pg_dump version: 8.4.9
;
;
; Selected TOC Entries:
;
6; 2615 20091 SCHEMA - census postgres
146; 1259 19845 TABLE census nyc_census_blocks postgres
145; 1259 19843 SEQUENCE census nyc_census_blocks_gid_seq postgres
2691; 0 0 SEQUENCE OWNED BY census nyc_census_blocks_gid_seq postgres
2692; 0 0 SEQUENCE SET census nyc_census_blocks_gid_seq postgres
2681; 2604 19848 DEFAULT census gid postgres
2688; 0 19845 TABLE DATA census nyc_census_blocks postgres
2686; 2606 19853 CONSTRAINT census nyc_census_blocks_pkey postgres
2687; 1259 20078 INDEX census nyc_census_blocks_geom_gist postgres
Tener solo las tablas de datos es útil, porque significa que podemos restaurar a una base de datos con cualquier versión de PostGIS instalada, como hablamos en Actualizaciones del Software.
38.2.1. Respaldo de usuarios
La utilidad pg_dump opera sobre una base de datos a la vez (o un esquema o tabla a la vez, si lo restringes). Sin embargo, la información de usuarios se almacena en todo un clúster, ¡no está en ninguna base de datos específica!
Para respaldar tu información de usuarios, usa la utilidad pg_dumpall con la bandera «–globals-only».
pg_dumpall --globals-only --port 54321
También puedes usar pg_dumpall en su modo por defecto para respaldar un clúster completo, pero ten en cuenta que, al igual que con pg_dump, terminarás respaldando las firmas de funciones de PostGIS, por lo que el volcado deberá restaurarse en una instalación de software idéntica, no puede usarse como parte de un proceso de actualización.
38.3. Respaldo y restauración en línea
El respaldo y restauración en línea permite a un administrador mantener un conjunto extremadamente actualizado de archivos de respaldo sin la sobrecarga de volcar repetidamente toda la base de datos. Si la base de datos tiene una carga frecuente de inserciones y actualizaciones, entonces el respaldo en línea podría ser preferible al respaldo básico.
Nota
La mejor forma de aprender sobre el respaldo en línea es leer las secciones relevantes del manual de PostgreSQL sobre archivado continuo y recuperación a un punto en el tiempo. Esta sección del taller de PostGIS solo proporcionará una breve visión del proceso de configuración del respaldo en línea.
38.3.1. Cómo funciona
En lugar de escribir continuamente en las tablas principales de datos, PostgreSQL almacena los cambios inicialmente en «write-ahead logs» (WAL). Tomados en conjunto, estos registros son un registro completo de todos los cambios hechos a una base de datos. El respaldo en línea consiste en tomar una copia de la tabla principal de datos de la base de datos, luego tomar una copia de cada WAL que se genere a partir de entonces.
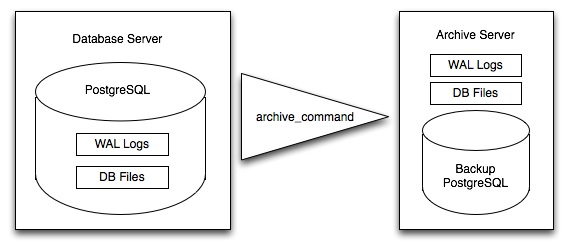
Cuando llega el momento de recuperar en una nueva base de datos, el sistema comienza con la copia principal de datos, luego reproduce todos los archivos WAL en la base de datos. El resultado final es una base de datos restaurada en el mismo estado que la original en el momento del último WAL recibido.
Como los WAL se escriben de todas formas y transferir copias a un servidor de archivo es computacionalmente barato, el respaldo en línea es un medio eficaz de mantener un respaldo muy actualizado de un sistema sin recurrir a volcados completos regulares intensivos.
38.3.2. Archivado de archivos WAL
Lo primero que hay que hacer al configurar respaldo en línea es crear un método de archivado. Los métodos de archivado de PostgreSQL son lo último en flexibilidad: el backend de PostgreSQL simplemente llama a un script especificado en el parámetro de configuración archive_command.
Eso significa que el archivado puede ser tan simple como copiar el archivo a una unidad montada en red, o tan complejo como encriptar y enviar por correo electrónico los archivos al archivo remoto. Cualquier proceso que puedas escribir en un script puedes usarlo para archivar los archivos.
Para activar el archivado editaremos postgresql.conf, primero activando el archivado WAL:
wal_level = archive
archive_mode = on
Y luego configurando el archive_command para copiar nuestros archivos de archivo a una ubicación segura (cambiando las rutas de destino según corresponda):
# Unix
archive_command = 'test ! -f /archivedir/%f && cp %p /archivedir/%f'

# Windows
archive_command = 'copy "%p" "C:\\archivedir\\%f"'
Es importante que el comando de archivado no sobrescriba archivos existentes, por lo que el comando de unix incluye una prueba inicial para asegurarse de que los archivos no estén ya allí. También es importante que el comando devuelva un estado distinto de cero si el proceso de copia falla.
Una vez hechos los cambios, puedes reiniciar PostgreSQL para hacerlos efectivos.
38.3.3. Tomando la copia base
Una vez que el proceso de archivado está en marcha, necesitas tomar una copia base.
Pon la base de datos en modo respaldo (esto no altera en nada la operación de consultas o actualizaciones de datos, solo fuerza un checkpoint y escribe un archivo de etiqueta indicando cuándo se tomó el respaldo).
SELECT pg_start_backup('/archivedir/basebackup.tgz');
Para la etiqueta, usar la ruta del archivo de respaldo es una buena práctica, ya que te ayuda a rastrear dónde se almacenó el respaldo.
Copia la base de datos a una ubicación de archivo:
# Unix
tar cvfz /archivedir/basebackup.tgz ${PGDATA}
Luego indica a la base de datos que el proceso de respaldo está completo.
SELECT pg_stop_backup();
Todos estos pasos, por supuesto, pueden ser automatizados con scripts para respaldos base regulares.
38.3.4. Restauración desde el archivo
Estos pasos están tomados del manual de PostgreSQL sobre archivado continuo y recuperación a un punto en el tiempo.
Detén el servidor, si está en ejecución.
Si tienes espacio suficiente, copia todo el directorio de datos del clúster y cualquier tablespace a una ubicación temporal en caso de que los necesites más adelante. Ten en cuenta que esta precaución requiere tener suficiente espacio libre en tu sistema para mantener dos copias de tu base de datos existente. Si no tienes espacio suficiente, al menos deberías guardar el contenido del subdirectorio pg_xlog del clúster, ya que podría contener registros que no fueron archivados antes de que el sistema se detuviera.
Elimina todos los archivos y subdirectorios existentes en el directorio de datos del clúster y en los directorios raíz de cualquier tablespace que estés utilizando.
Restaura los archivos de la base de datos desde tu respaldo del sistema de archivos. Asegúrate de que se restauren con la propiedad correcta (el usuario del sistema de base de datos, ¡no root!) y con los permisos adecuados. Si estás usando tablespaces, deberías verificar que los enlaces simbólicos en pg_tblspc/ se restauraron correctamente.
Elimina cualquier archivo presente en pg_xlog/; estos provienen del respaldo del sistema de archivos y probablemente estén obsoletos en lugar de ser actuales. Si no archivaste pg_xlog/ en absoluto, entonces recréalo con los permisos adecuados, asegurándote de restablecerlo como un enlace simbólico si lo tenías configurado de esa manera antes.
Si tienes archivos de segmentos WAL no archivados que guardaste en el paso 2, cópialos en pg_xlog/. (Es mejor copiarlos, no moverlos, para que aún tengas los archivos sin modificar si ocurre un problema y debes empezar de nuevo.)
Crea un archivo de comando de recuperación recovery.conf en el directorio de datos del clúster (ver el Capítulo 26). También puedes querer modificar temporalmente pg_hba.conf para evitar que usuarios ordinarios se conecten hasta que estés seguro de que la recuperación fue exitosa.
Inicia el servidor. El servidor entrará en modo de recuperación y procederá a leer los archivos WAL archivados que necesita. Si la recuperación se interrumpe por un error externo, el servidor puede simplemente reiniciarse y continuará con la recuperación. Al completarse el proceso de recuperación, el servidor renombrará recovery.conf a recovery.done (para evitar entrar accidentalmente en modo de recuperación más adelante) y luego comenzará las operaciones normales de base de datos.
Inspecciona el contenido de la base de datos para asegurarte de que se haya recuperado al estado deseado. Si no es así, vuelve al paso 1. Si todo está correcto, permite que tus usuarios se conecten restaurando pg_hba.conf a su estado normal.

